Saturday 26 May 2012

Nothing special but something quite special


No, these are not home-grown strawberries and yes, they are just from an ordinary supermarket. But the other day as I was making myself a nice, simple AND healthy dessert, I just realised how beautiful these strawberries look.


I love the way the are all so plush and red. And the little sugar crystals give a really sparkly touch to it! I know, I may be a LITTLE exaggerated, but they are ever so refreshing in this blazing hot weather. Gives the cue for summer to come! 


Friday 25 May 2012

Savoury AND sweet? - Rosemary orange olive oil cupcakes

It came to me that I didn't want to bake in this sweating hot weather but was "encouraged" to get something sizzling in the cool oven again when I found some cracked eggs on the shelf. I can't believe it! I was pretty sure I checked there were no "zig zags" before I placed it into the shopping trolley! Oh wells, an "encouragement" as I see it.


So here I am, scummaging through various blogs to rustle up a unique and interesting recipe. I was about to give up seeing as the sun was upon me and I could see myself getting very annoyed probably at even measuring out my ingredients! - until I saw a recipe as cool as this.


I couldn't believe what I was seeing! Rosemary orange olive oil cupcakes?!!? Are you sure about that? I was awestruck and scanned down the list of ingredients. I was pretty sure I saw olive oil. A cupful of olive oil. Wow. This would be the most healthiest and most unique recipe I've seen.


And now I was a determined sweating monster, eager to try out this recipe. and boy did it seem like I actually worked to come through a recipe like this cos I was so hot and sticky. I've got to admit, these were some pretty awesome cupcakes! The orange juice added to the sweetness of the cake and the olive oil and rosemary? - delightful. The rosemary surprisingly shone through the sponginess and I was so so SO proud of this recipe.

 I particularly love this set of photos although I hadn't made much effort even to add some interest to it. They were taken during sunset, hence the orange colour to it. Somehow though, I really love that glowing effect so I decided to keep it there!


This recipe originally came from Daisy's world here. Her recipes are brilliant and her "beauty shots" as she calls them look amazing! As for me, I barely even dress my bakes when I photograph them; something I must learn for the future! Enjoy!

Monday 21 May 2012

Choco Orange Tarts

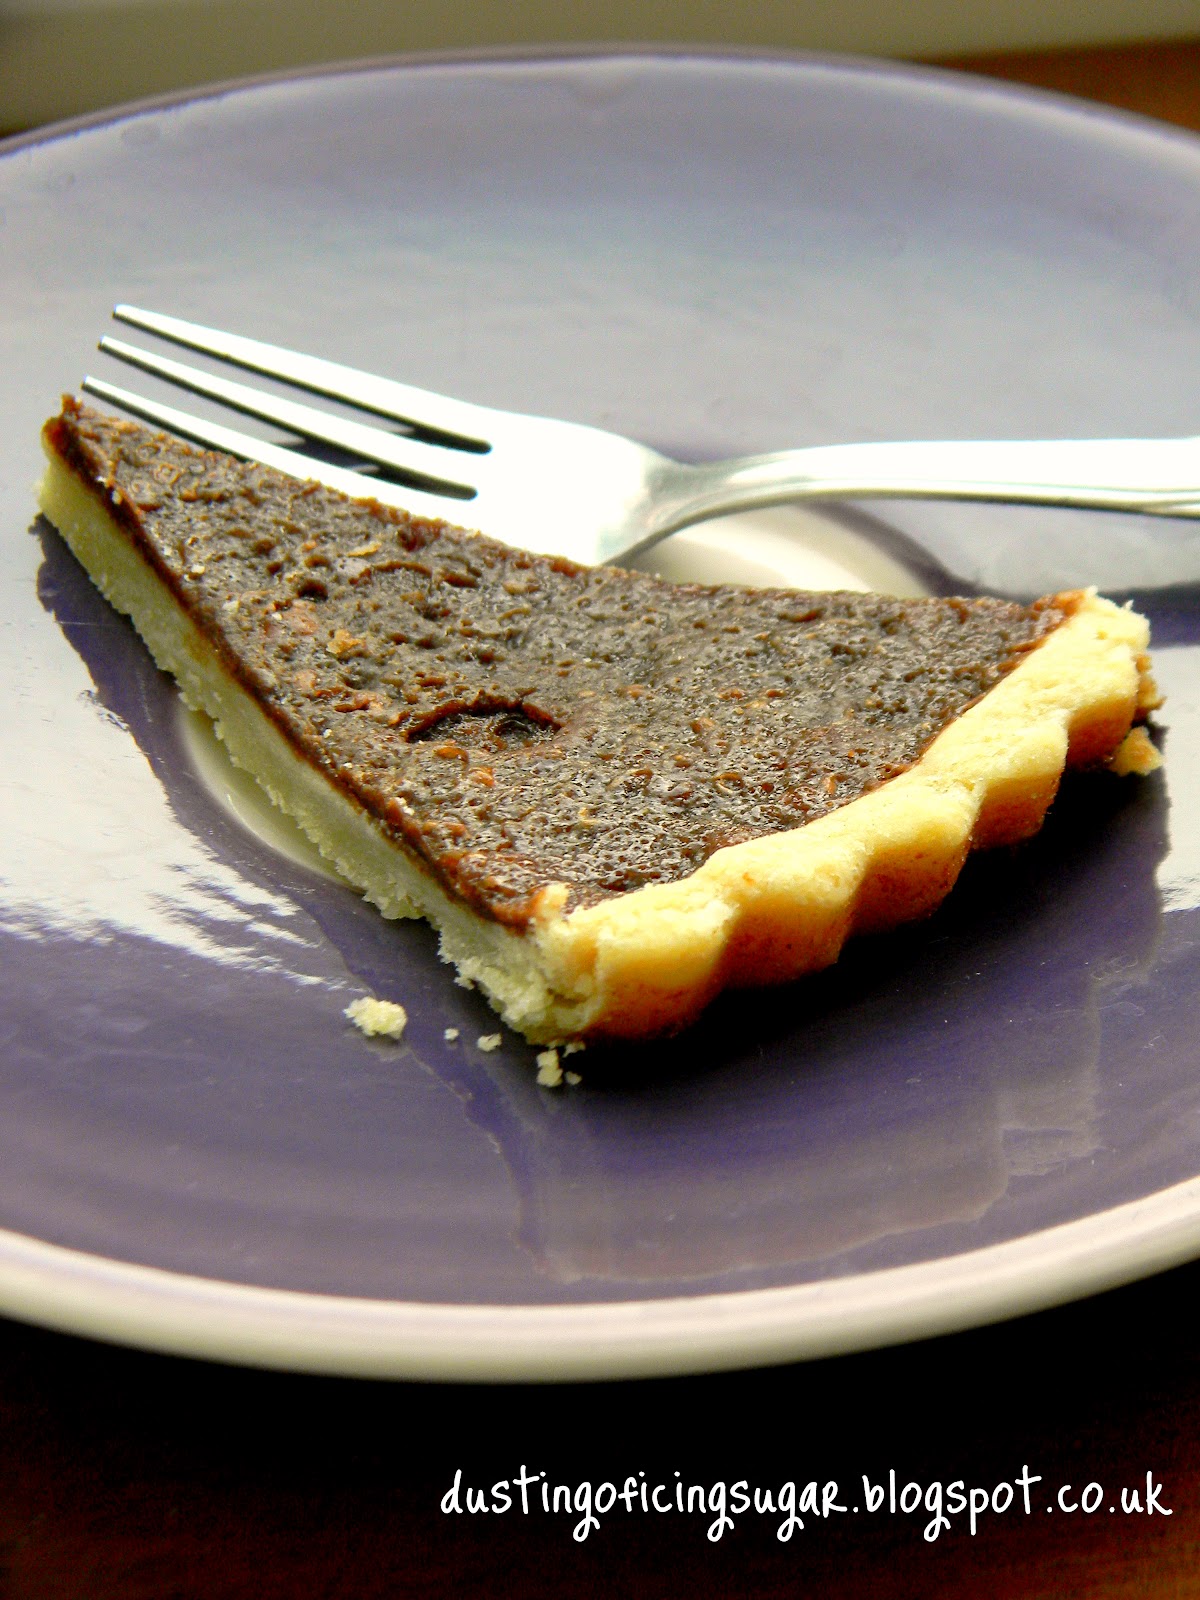
I have happened to make these tarts during the week as a light dessert. These came out better than I had expected to be honest. They weren't as sweet as I thought they were going to be and they had a delicate orange scent to it.

In the recipe, it suggests to use Grand Mariner or Cointreau but I've substituted it with concentrated orange juice for a non-alcohol dessert. I'm sure these little choc treats would look more dainty if they were to be "dusted with icing sugar"!


The recipe yields a large tart however I made them again the following day as they were so well loved. However, this time I experimented with them a bit more and created little mini tartlets - excellent for parties! 


Chocolate Orange Tart
Ingredients:
1 block of ready made sweet shortcrust pastry
a little beaten egg to seal the pastry case
icing sugar to dust
Filling:
175g plain chocolate (at least 50% cocoa solids), chopped
175ml double cream
75g light muscovado sugar
2 medium eggs
1 tbsp Grand Mariner or Cointreau or concentrated orange juice

Method:
1. Roll out the pastry on a lightly floured surface and use to line a 8 inch loose-based tart tin. Prick the base all over with a fork, put the tin on a baking sheet and chill for 30 minutes.
2. Preheat oven to 190C/170 fan/gas 5. Bake the pastry blind for 15 mins, removing the beans and baking for another 5-10 mins. Then brush the inside with egg and put back in the oven for 1 minute to seal.
3. Remove from the oven and lower oven temp to 170C/150 fan/gas 3.
4. For the filling, melt chocolate in a heatproof bowl set over a pan of simmering water. (make sure the bowl doesn't touch the water) Remove the bowl from the pan and cool for 10 minutes.
5. Put the cream, muscovado sugar, eggs and liquer into a bowl and stir with a wooden spoon until mixed thoroughly. Gradually stir in the chocolate and then pour into the pastry case and bake for 20 minutes or until just set.
6. Serve warm or cold, dusted liberally with icing sugar.


Wednesday 16 May 2012

Matcha bubblies~

Nom. or shall I say "gulp"? These matcha bubblies are perrr-fect for those hydrating afternoons. I know its quite wrong saying that seeing as I live in England with the everlasting rain. However, the day has been surprisingly sunny today so I've made my very own matcha bubble tea!


 Those of you that do not know what bubble tea is - you're missing out! no worries though; I'll fill you in :)
 Bubble tea is basically a drink originating from Tawian back in the 80's! - can you believe it?! They were originally served as tea but is now available in many flavours - hooray!! I know, it doesn't sound very interesting - even Waitrose's juice has different flavours apart from orange and apple, right?!


BUT it is a complete different story. They have little chewy tapiocaballs, also known as pearls. They are mostly found in black but I came across a multi-colour version which is great for sprucing up a fantastic drink like this!


I don't exactly have a recipe for this as I kinda splashed together a few ingredients of mine to get a quick drink. But it follows the lines of ...

1) making the tapioca balls, following the instructions on the packet
2) mixing some matcha powder with milk (add matcha to taste)
3) adding some icing sugar to taste to sweeten the drink
4) placing the tapioca balls in
3) Topping with some squirty cream, sprinkling on some sprinkles and finishing off with a tapioca ball on the top!


For some more variations you could try using almond milk or soya milk instead of fresh milk, spicing it up with cinnamon or some ground ginger, adding cut pieces of fruit....the list goes on! have fun ;)

Monday 14 May 2012

Creamy rhubarb tarts

I know; I know. It's rhubarb again. But its amazing! I love that bit of zing to tickle your taste buds once in a while!


I've decided to place rhubarb on puff pastries this time. and yes - I've already figured out that I am obsessed with puff pastry too. I came across this recipe the other day as I was looking for ways to finish off my rhubarb from the muffins I made before they started to go bad :(


For this recipe, it states to use crème fraiche as its base to give that extra "creaminess" to indulge you into rhubarb tart land. It has certainly worked in making the puff pastry less dry and adding some texture to it. Also, it hasn't seem to make my base "soggy".


These immensely easy peasy to make tea-time treats are great for desserts or parties. They are also super quick to make!

Here's the recipe; from BBC goodfood:

Creamy Rhubarb Tarts
Ingredients:
375g all-butter puff pastry
1 egg, beaten
1 tbsp demerara sugar
1 tbsp creme fraiche
2 sticks rhubarb, thinly sliced on an angle
2 tbsp icing sugar

Method:
1. Preheat oven to 220C fan/200C/gas 7. Roll the pastry out thinly and using a cutter, cut out 4 circles about 14cm in diameter. Using a slightly smaller cutter, cut out a circle out of the middle and trim away the outside border, reserving these trimmings.
2. Lay the 4 circles on a baking sheet, prick all over with a fork and brush the edges with egg. Use the pastry trimmings to make a border around the edge like a vol-au-vent and press down gently with your thumb. Chill until needed. This can be done up to 1 day ahead or frozen for up to 1 month.
3. In a small bowl, mix the demerara sugar with the crème fraiche and spread a thin amount over the base of each tart. Neatly arrange the slices of rhubarb, overlapping in a floral pattern (I was too lazy to do this and just slapped everything on!) over the crème fraiche. Dust generously with icing sugar. Bake the tarts for 20 mins until puffed and golden. leave to rest for a few minutes and eat warm. Delicious with a scoop of ice cream!

Wednesday 9 May 2012

Rhubarb Crumble muffins.

Looks like a breakfast; WAS my breakfast. A good brekkie as well!
Its absolutely super duper healthy. well, to me anyway.


These muffins are stuffed with the most zingy fruits of all -rhubarb. Don't you just love that smell of sticky, cooking rhubarb when you wake up!?


They are best eaten when freshly made as the muffins are the softest and fluffiest and the topping is crispiest then. I came back to them the next morning and by that time, the crumble had gone a bit soggy :(


If planning to eat them after a day or two, I would advise zapping it in the microwave for a few seconds and then pouring custard over to make it nice and moist again. Sounds like dessert to me as well! Anyhow, enjoy the recipe :)

Rhubarb Crumble Muffins - makes 12

 Ingredients:
 375g self-raising flour
130g brown sugar
100g butter, melted
250ml milk
1 egg, lightly beaten
Rhubarb filling:
190g chopped rhubarb
55g caster sugar
2 tbsp water
1/4 tsp grated lemon rind
Crumble topping:
35g plain flour
65g brown sugar
2 tbsp toasted muesli
1 tsp grated lemon rind
30g butter, melted

Method:
1. Preheat oven to 200C/180 fan-assisted. Grease a 12 hole muffin pan or use muffin cases.
2. Sift dry ingredients into a large bowl and stir in the remaining ingredients.
3. Half-fill muffin pan/cases with the muffin mixture and spoon the rhubarb filling into wells. Top with the remaining muffin mixture and spread the crumble topping on, pressing gently onto the muffin mixture.
4. Bake for about 20 minutes then stand muffins for 5 mins before turning top-side up onto a wire rack to cool.

Rhubarb filling
combine all ingredients in a small pan and bring to boil. Simmer uncovered for 5 mins or until mixture is thick and rhubarb is soft. let it cool.
Crumble topping:
Combine all ingredients in a small bowl and mix well.


Tuesday 8 May 2012

Strawberry Macarons

So I'm back! - with a whole lot more of macaron cravings to show you. I came across a blog the other day as I was hunting down a strawberry macaron recipe.


It was sure hard looking for this recipe as many macarons were identified for its flavour of the filling, not the actual shell; if you get what I mean. In other words, macarons filled with a strawberry filling came up instead of strawberry flavoured shells.


I was really surprised when I saw the secret ingredient in flavouring the shell. Ok, not as much of a secret now, by HEY. I was surprised.


So the secret ingredient was in fact strawberry nesquick! surprised as I was, I dug out my box of milkshake and away I sailed.....

To be honest with you, I wasn't quite happy with my macarons this time. The "feet" weren't evident and the macarons have seem to gone all flat :( So I'm afraid the only pictures are of the "best ones". Oh well, nutella makes things better!

Monday 7 May 2012

Green tea macarons

Carrying on from my macaron craze....
These macs are sure to die for. They came out perfectly as well! The looks, the texture; WOW!
My favourite flavour has been green tea in BIG time. I totally love the aroma of it. Everything that has the option of green tea I will get. This goes from ice creams, to cakes, to cheesecakes, to macarons!


 I am so proud of these macs this time that you won't believe it!


The last time I made them, chocolate was still an option, but I'm afraid these green tea ones have won me over completely!


I've sandwiched them with a buttercream filling, o0o0o0o0o.....tastyyyy.
Related Posts Plugin for WordPress, Blogger...