Thursday 13 December 2012

Insta-Thursty: week 4

With 3 minutes until thursday is over, I better get this post quickly published!

It has been a most certainly frosty week but it has led to the atmosphere feeling a little bit more christmassy although there is the odd pain of scraping the ice off the car every morning. It is all worth it however when you come to gathering bits and bobs for your dear family and friends for Christmas and can finally push your inner creativity out a bit more.

a DIY photo garland for the tree


cooking up a risotto with my sister
bitta nom for dinner


completing my art coursework at 11:30pm


beautiful sunset


first bit of snow!


dustingoficingsugar

Saturday 8 December 2012

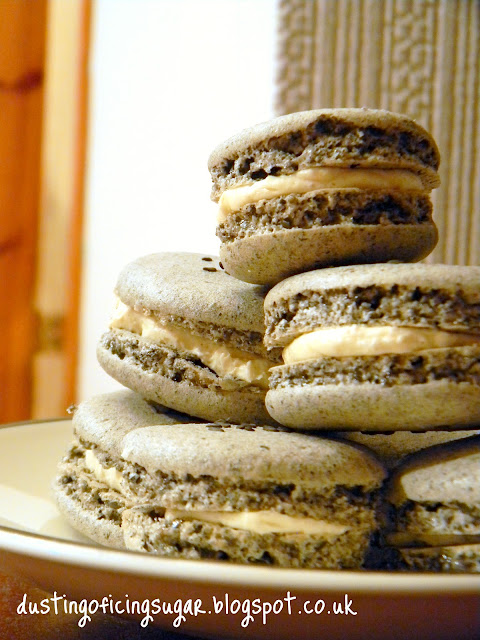
Black sesame macarons

It has been a most great week for me and I have absolutely been dying to share with you this recipe. 

nut free black sesame macarons - dustingoficingsugar.blogspot.co.uk

It is an incredibly simple nut-free macaron recipe and gives those friends of ours who simply cannot "crack those nuts" an opportunity to indulge in the beauty of macarons.

nut free black sesame macarons - dustingoficingsugar.blogspot.co.uk

The recipe comes from here and is so easy that I even decided to make a step-by-step post. And you know I don't normally do this! 

nut free black sesame macarons - dustingoficingsugar.blogspot.co.uk

Of course, her photography is so much more amazing and she has sandwiched her yummies with an indulgent chocolate cherry ganache. I've just simply whipped up a quick mixed spice buttercream to spruce things up a bit ;)

nut free black sesame macarons - dustingoficingsugar.blogspot.co.uk

Click here for the recipe!

nut free black sesame macarons - dustingoficingsugar.blogspot.co.uk
You only need three simple ingredients for the tasty macaron shells!
nut free black sesame macarons - dustingoficingsugar.blogspot.co.uk
Blend the sesame seeds and caster sugar together thoroughly to resemble a fine powder
nut free black sesame macarons - dustingoficingsugar.blogspot.co.uk
Whisk the egg whites to soft peaks and add the sugar. Now whisk to stiff peaks!


nut free black sesame macarons - dustingoficingsugar.blogspot.co.uk
Sieve in the sesame seed and caster sugar powder through a fine sieve, blending again the bits too large to fit through and add to the mix in three batches. Fold through gently to resemble a lava-like consistency.

nut free black sesame macarons - dustingoficingsugar.blogspot.co.uk
Using a tall glass, place the piping bag into it and fold the edges out. Fill the piping bag with the batter and then pipe rounds onto parchment paper. Sprinkle on some sesame seeds to garnish and bake! A cooked macaron base should look like the last photo.

nut free black sesame macarons - dustingoficingsugar.blogspot.co.uk
I simply whisked up a quick and fluffy mixed spice buttercream. Spread over a half (or pipe if you're feeling posh!) and then sandwich with another half.
 And tra-da! Easy peasyyyyy - enjoy!


nut free black sesame macarons - dustingoficingsugar.blogspot.co.uk


DIY: Photo Garland

After the last DIY post I did, I felt a little more encouraged to make another one, realising it wasn't as daunting to take photos at every step of the project. Today, I have decided to introduce a...


An extremely easy project that will satisfy your home! The only tricky part is probably choosing your most memorable photos of the year. I had always wanted to spruce up the christmas tree with a personal touch and so the idea of adding yearly photographs onto it came about. I think not only is it a good visual representation of the year, but also as a reminder of thanksgiving for such joyous moments and the many blessings I have had these 365 days (kinda, just a few weeks to go!). To make this photo garland, you will need:


To print my photographs out, I used picasa and selected "create a collage" from a folder of my chosen black and white photographs. I then used the "grid" format to arrange 12 photos onto one A4 page, a reasonable size for a mini photograph. You can, of course do it however you like! Cut out the photographs and then recount the happy memories of the year....


When you're done, we start making some awesome paperclips!


These easy-as-pie-cute-papeclips are not made by de-structuring a whole paperclip into a heart shape and not being able to actually use them as paperclips again, but are magically bended so that it works as a normal paperclip but with the added cute heart shape too. The steps are as follows:

1) Take a normal paperclip, coloured or non-coloured, it will look just as cute!
2) Like in the photo, make sure the flicky bit of the paperclip is at the top and pointing towards the right. Holding the middle of the bottom wire, flex upwards towards the left.
3) It should come something like this...
4) Flip the paperclip over and you should have something funny-looking like this. Do you vaguely see the outline of the heart shape?! And you're done - simply use and clip by sliding the photo in the slot, just under the "bottom point" of the heart!


Make a whole string of it by attaching each photo onto a long piece of ribbon. 


Just a few more to go! And then wrap it around your Christmas tree for some added memories of the happy year.


p.s. sorry you had to bear with the iphone pictures, camera had no battery!

Thursday 6 December 2012

Insta-thursty: Week 3

It has been such an encouraging Thursday today, finally receiving my piano exam results that I had been worrying about here. Well, aren't I just glad to announce that I have PASSED my exam, with a MERIT! I'm so so glad, and dearly thank God for this. Here's my week, instagram style!

The whimsical feathers of cloud

The beautiful sunset I love to watch

Covent gardens, London with my cousin and sister in the harsh but festive weather

Tree and lights are officially up this week, the Christmas spirit is officially ruling the house!

Completing my art homework and indulging in my sesame macarons at the same time (recipe to follow up soon!)

and lastly, my exam certificate that just arrived this afternoon :)

Thank you God for such a blessed week!

dustingoficingsugar

Saturday 1 December 2012

Green Tea and Strawberry Chiffon Cake

Firstly, hello December! I've been looking forward to this month of festive celebrations and traditions since last year!


And secondly, oh haven't I just got the most fabi-doo-cious cake to share!

I have instagrammed about this cake previously; the making of it, to the assembling of it and to the eating of it. Pure nom.


The cake is simply made up of two layers of green tea chiffon cake and two layers of strawberry chiffon cake. I have been on the hunt for a strawberry chiffon cake that uses real strawberries, not flavouring or colouring - uh-huh. And I'm so glad I managed to fall upon this recipe. Real strawberries is what I wanted to see. It says to use a strawberry paste but I wasn't able to find any when I decided to make this cake at the very last minute. Luckily, the strawberry flavour does shine through ever so vaguely and you get a hint of its berriness.


I'm so pleased that both cakes came out of the oven so successful - both cakes were so light and spongey and when cut, had the lovely contrast between the two colours; natural pink and green colours.


As I had to travel all the way to central London with the cake, I could not possibly use a whip cream topping I normally go for with chiffon cakes. Therefore, it calls for the instant angel delight pudding. I have chosen to use a strawberry flavoured one to emphasise on the vague strawberry sponge and also for its bright colour. I have also previously used it for this birthday cake! And to top it all off, I added some fruit flakes to it :P

Happy Birthday to my dearest Grandma
Related Posts Plugin for WordPress, Blogger...